Naomi Folkard talks shoulder alignment for recurve archers.
The shoulder is a remarkably mobile joint. The humerus – the long bone in the upper arm between your elbow and
your shoulder – fits into the scapula like a ball and socket joint, but relatively loosely which gives the arm a huge range of motion including the ability to rotate the humerus.
Movement also comes from the flexibility of the clavicle joints which allowing the shoulder to move up and down, forward and backward and to a small extent linear in and out.
This mobility can make it difficult to achieve a reliable and stable front shoulder position which allows a consistent draw length, resists the force of the bow without creating torque and generates a good execution. Even the best of us can struggle to keep the shoulder set towards the target during the draw.
People with poor conditioning can have little control over the joint especially when under load which makes winging of the scapular, over-rotation of the humerus, a rolled over front shoulder, or a high shoulder etc. much more likely.
The ideal position really is quite simple. Throughout the shot the shoulder should be at a neutral height, neither raised up nor depressed down. If you are not sure, try standing or sitting upright and relax the shoulders, this is the height they should be at.
The humerus should sit in a neutral position in the socket and the shoulder should be in a neutral lateral position, the head of the humerus must not be rolled forwards nor should it protrude forwards, as this is a high injury risk and allows instability on execution.
The scapulae should lie flush with the ribs, they should not be winging (sticking out at the bottom & near the spine).
The elbow should be rotated and locked out (for archers with “normal” elbows) to activate the triceps and deltoids and keeps the elbow out of the way of the string, this rotation causes the humorous to rotate a small amount within the shoulder. Archers with hyper-mobile elbows will need to straighten and rotate the elbow just enough to keep it out the way.
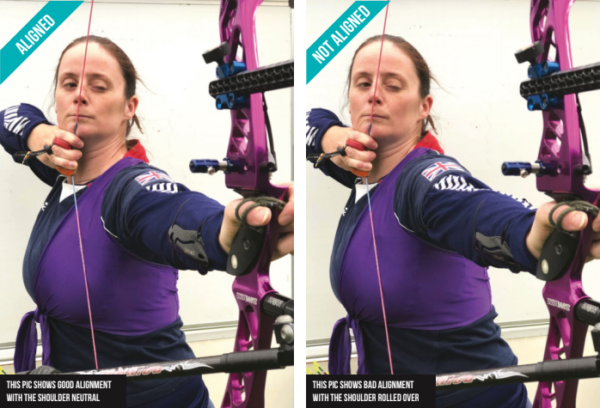
Although in principle the ideal front shoulder position seems quite simple, there are people who really struggle to achieve it. Typical mistakes are a high front shoulder and or a rolled over front shoulder. A rolled over front shoulder usually comes about by the archer trying to achieve alignment, they think about leading with the front of the shoulder to get into line.
This is not the way to achieve alignment. When making the small rotation of the torso to achieve alignment, do not allow the scapula to raise up, by keeping the scapula down and in place the shoulder cannot roll over, the scapula should feel “flat” and the humerus should feel solid within the joint.
A high front shoulder can be caused by poor posture, lack of strength and lack of coordination. Putting the posture into the most simple terms, stand up straight with hips tucked slightly under to engage the glutes, the arms and shoulders should move without any change in your basic shape.
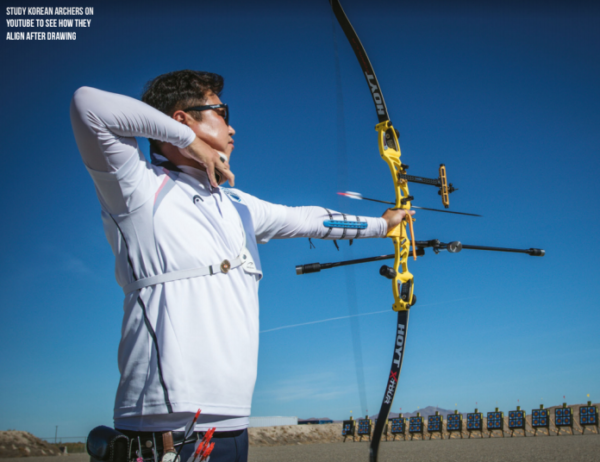
The Korean style is the best draw technique to use if the goal is to make the front shoulder good. When it’s good, it is very relaxed throughout the shot, both the front and back hands and the back elbow raise level with the forehead with a small break in the string, this is a “safe” draw so long as the arrow stays horizontal and then bring the hands down together as the string is broken more, a tiny pause when the back hand is just in front of the face to settle down before getting to full draw.
Believe it or not, it’s actually easier to relax the shoulder and keep it down by raising the arm this high than to raise it just to the horizontal. When the hands come down the shoulder naturally becomes engaged and is more able to resist the force of the bow.
 The Koreans openly say that they use this technique to minimise shoulder injury. If this is very difficult then there is probably a significant lack of strength and coordination in relation to bow weight and poundage, to resolve this lack of strength and coordination a lot of work needs to be done. Introduce drills using clinibands or light manageable weights where appropriate, the first priority should be to ensure that the posture and shoulder positions are good, the second priority should be to build up the difficulty by increasing weight and repetitions.
If the back elbow is out of alignment it’s harder to have a clean execution because muscles have to work harder to maintain position, when in alignment the bones do most of the work, and any execution error is exaggerated as the hand will move out to the side of the chin as well as forwards.
When the clicker goes and the string is set in motion, the grip initially pushes into the hand before it falls forwards into the sling, this is the critical moment when torque and execution error can impact the bow.
With the shoulder set in a neutral position, the head of the humerus sat in the middle of the socket and the elbow rotated at full draw as described, the shoulder and arm become one solid unit, the pressure can go through the bone at base of the thumb (or slightly higher if you prefer) and into the centre of the grip at the target to finish the shot off, which minimises any torque and execution error from the front end.
During the follow through the front arm should act towards the target and then towards the left side of the target (for right-handed archer) and not drop by more than an inch.
Fixing alignment issues
Good exercises (check some of these on YouTube if you’re not sure) include lateral raises to the horizontal with a three second hold, slow Korean style draws with cliniband, forward raises to the vertical keeping the shoulder down throughout, rows, internal and external rotations, lat pull downs, dead bugs, and side anterior and supine holds or planks.
After a few weeks of doing these exercises 4-5 times per week the archer should be able to demonstrate better technique on a light bow if not their normal bow. Needless to say, all exercises should be completed in a controlled and safe manner.
The best way to practise getting good alignment using a light bow or cliniband. Study videos to see how world class athletes achieve alignment and get into the habit of using video replay to critique yourself. Often people with poor alignment don’t have a transfer and only think about the movement of the scapular to get to full draw, when actually the bulk of the movement required comes from the humerus.
If you want to go a bit deeper, start thinking about the back end of the acromion (nobbly bit on the back side of the shoulder near the top) and moving that behind the front shoulder, this gets the shoulders into line, but we also need the elbow to be in a straight line with the forearm hand and arrow, try thinking about moving the elbow, or the humerus pushing the acromion around.
Putting in a transfer into the shot can help to achieve complete alignment. Watch Chang Hyejin (Korea) shoot, for an incredible example of a transfer, the string is solid into the chin when the back elbow is still on the move and the elbow settles into position as soon as it makes alignment. Put a light cliniband around the limb pocket and string, long enough for it to be slightly saggy at bracing height.
Shoot three ends with it on and one end with it off at 30m, repeat three times. The extra poundage (ideally 2-3lb) may force you to improve your alignment as it’s much easier to be in alignment at let the bones take the weight than not being in alignment and the muscles have to work.
If I struggle to feel my alignment I do this and it works like magic. Reversals are great for improving the strength to poundage ratio which can make alignment easier to find, but reversals can also help you to understand the feeling of alignment and the position that you need to achieve.
It’s possible to have good alignment but still feel like that alignment is getting lost while at full draw, this is likely to be caused by a soft front arm which is not maintaining the resistance. This can be really annoying as it feels like the back end which is the problem and much effort is put into correcting it, when in fact it’s the front that just needs a little extra focus to make it work.
I advise further research, and you can start by watching videos of Korean archers on the internet. Alignment is an area where it’s essential to take control of your own technique and spend time learning about yourself.
